- Host Discovery
- Scan Techniques
- Obtaining extra information
- Port Specification
- Timing and Performance
- Nmap Scritps
Nmap uses raw IP packets to determine what hosts are available on the network, what services (application name and version) those hosts are offering, what operating systems (and OS versions) they are running, what type of packet filters/firewalls are in use, and dozens of other characteristics.
All the examples have been done with a local machine with IP 192.168.122.136. If you want to try it yourself, you just need to change the IP address.
Host Discovery
Flag Pn
nmap -Pn 192.168.122.136
This flag disables the host discovery Nmap does in order to determine active machines. In the following image you can see that Nmap does the TCP handshake before sending the probes. It does the three steps:
- SYN (source - destination)
- SYN ACK (destination - source)
- ACK (source - destination)

However, if you launch Nmap with the flag -Pn, it avoids the handshake and it just starts sending probes:

Scan Techniques
Flag sT
nmap -sT 192.168.122.136
This flag is used by default when Nmap doesn’t have privileges, it scans TCP ports. In order to send the probes, it uses a system function called connect() which makes the scan to go slower than with the flag -sS.
In the following Wireshark screenshot you can see how Nmap scans the port 443. If Nmap is able to make all the steps, it will determine that the port is open:
- SYN (source - destination)
- RST SYN (destination - source)
- SYN (source - destination)
- RST ACK (destination - source)

It is recommended to use the sT flag if the scan is running from inside the network. Because although it is slower, it is more secure than the flag sS.
Flag sS
sudo nmap -sS 192.168.122.136
This flag is used by default when Nmap have privileges, it scans TCP ports. It is faster than sT flag because it doesn’t use system calls and it doesn’t end the connections.
In the following Wireshark screenshot you can see how Nmap scans the port 443. If Nmap receives the RST ACK, it will determine that the port is open:
- SYN (source - destination)
- RST SYN (destination - source)

If instead of the RST SYN Nmap receives an RST, it will determine that the port is closed. And if the target doesn’t answer, the port will be marked as filtered.
IMPORTANT: It is recommended using Nmap with this flag only when scanning targets from the Internet. Because of Nmap doesn’t close the connections, if you scan targets from internal network, it could collapse some firewalls causing a DoS due to internal firewalls have not the same configurations as the external ones and they are more permissive.
Flag sU
sudo nmap -sU 192.168.122.136
This flag is used to scan UDP ports and it can be combined with sT and sS in order to scan TCP and UDP ports at the same time.
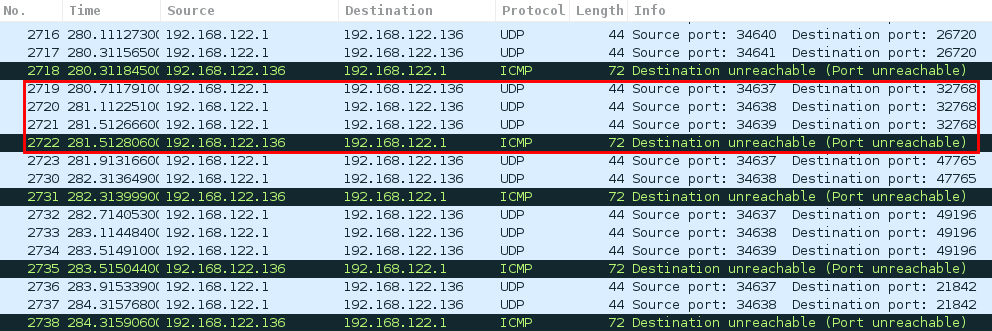
Scanning UDP ports with Nmap can take long because there are no error controls. Nmap keeps sending probes if no answer has been received, until it reach a number of tries:
- Open port: target answers with anything
- Closed port: target answers with an ICMP
- Open/Filtered: if there is no answer Nmap can not determine neither if it is open nor closed
In the following image you can see how Nmap sends some probes until the target answers with an ICMP (port closed):
An strategy people use to scan all UDP ports of a target or multiple targets without loosing a lot of time, is to use the tool unicornscan because it’s faster than Nmap. After the scan you can launch an Nmap over the results of unicornscan.
Obtaining extra information
Flag O
sudo nmap -O 192.168.122.136
With this flag, Nmap tries to guess which operative system is running in the target. It is important to understand that it is just a guess, so don’t take it seriously because there are a lot of times where Nmap is wrong.
If you have curiosity about how nmap guess the operative system, you can take a look into this website
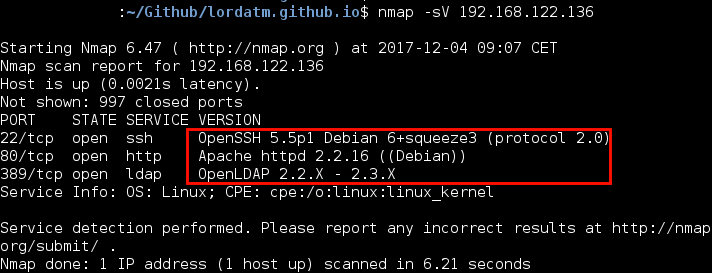
Flag sV
nmap -sV 192.168.122.136
Nmap sends probes to the open ports to determine the version of the service running:
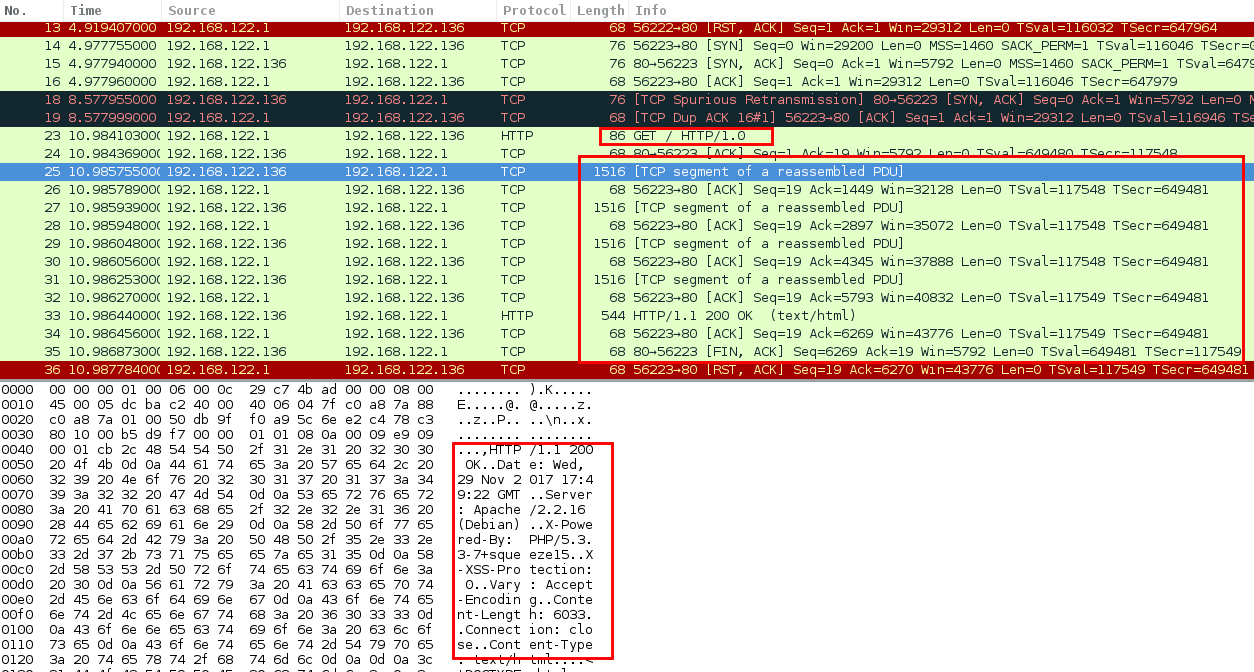
In order to obtain the information, Nmap uses multiples methods depending on the port it is analyzing. The following communication is an example of how Nmap gets the version of the port 80, it simply sends a ‘GET / HTTP/1.0’ and analyses the headers:
Flag sC
nmap -sC 192.168.122.136
If you want to obtain more information about the port, you can add this flag. For each port discovered, Nmap execute some scripts:

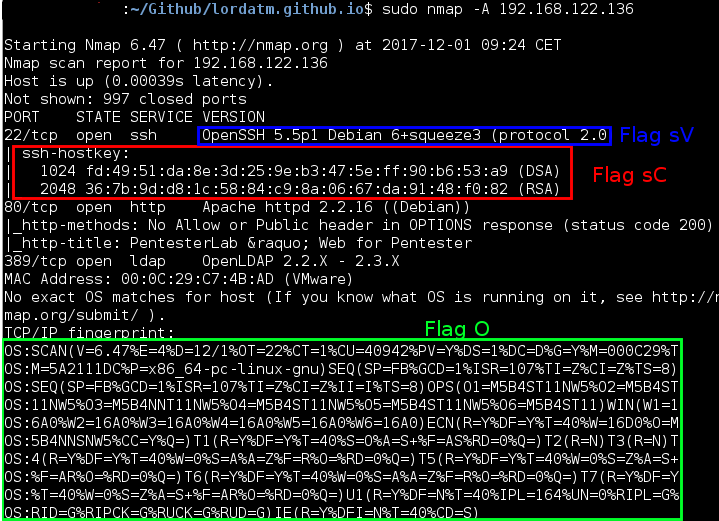
Flag A
nmap -A 192.168.122.136
This flag is a combination of -O, -sC and -sV:
Port Specification
Flag p
By default, Nmap scans the most common 1,000 ports for each protocol. With this flag you can specify which ports do you want Nmap to scan, for example HTTP and HTTPS:
nmap 192.168.122.136 -p 80,443
If you want to scan all the 65535 ports you need to add a - at the end:
nmap 192.168.122.136 -p-
Flag top-ports
With this flag you can make nmap to scan only the most common ports. For example, --top-ports 400 will scan the 400 ports most used, not the first 400 (1-400):
nmap --top-ports 400 192.168.122.136
Flag F
nmap -F 192.168.122.136
This flag only scans the top 100 ports.
An strategy I follow during the web auditories is to launch first nmap with the flag -F or --top-ports 25 so I can obtain fast results and start working. After this I decide if it’s worth to launch Nmap with the top 1000 ports or scan all of them. It will depends on the time I have.
However, some statistics show that sometimes it’s not worth to scan all the ports because it’s time consuming and you can obtain most of the information scanning only the most common ports:
- Top 100 ports: you will discover the 80% of the ports of the target
- Top 1000 ports: you will discover the 98% of the ports of the target
- Top 65535 ports: you will discover the 100% of the ports of the target
Timing and Performance
Nmap has 6 different modes (from T0 to T5) of running which will impact the time and performance directly. By default Nmap uses mode T3. However you can change it manually:
nmap -T5 192.168.122.136
If you are not scanning an old network or an SCADA environment, it’s not recommended using modes T0, T1 and T2 because they are too slow. Usually pentesters use modes T3 and T4 to scan the targets. The insane mode is only recommended to use if you know for sure that it will not saturate the target network.
In the following tables you can see the specifications of each mode:
| T0 | T1 | T2 | T3 | T4 | T5 | |
|---|---|---|---|---|---|---|
| Name | Paranoid | Sneaky | Polite | Normal | Aggressive | Insane |
| min-rtt-timeout [ms] | 100 | 100 | 100 | 100 | 100 | 50 |
| max-rtt-timeout [ms] | 300 000 | 15 000 | 10 000 | 10 000 | 1 250 | 300 |
| initial-rtt-timeout [ms] | 300 000 | 15 000 | 1 000 | 1 000 | 500 | 250 |
| max-retries | 10 | 10 | 10 | 10 | 6 | 2 |
| host-timeout [ms] | 0 | 0 | 0 | 0 | 0 | 900 000 |
| parallelism | No | No | No | Yes | Yes | Yes |
Each one of these attributes can be modified adding them as a flag, for example:
nmap -T3 --initial-rtt-timeout 500 192.168.122.136
There are a few more attributes, you can check them out in the man.
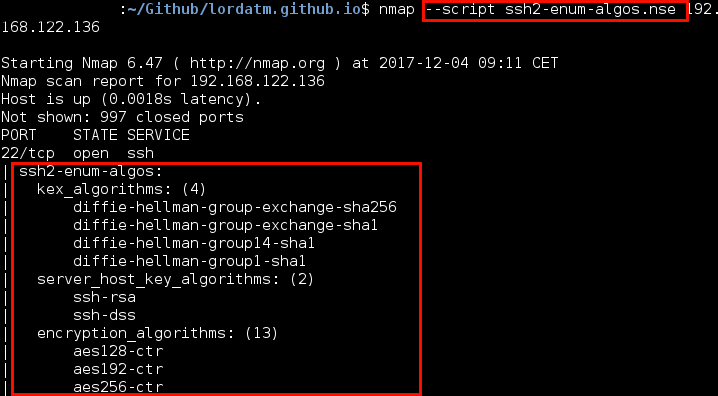
Nmap Scritps
Nmap allows the user to launch scripts to specific ports. In the folder /usr/share/nmap/scripts you can find scripts NSE which you can use with the flag --scripts:
nmap --script script_name.nse 192.168.122.136
The output of the script will be seen below the affected port: