Introduction to iOS system security, encryption and data protection, app security and Objective C.
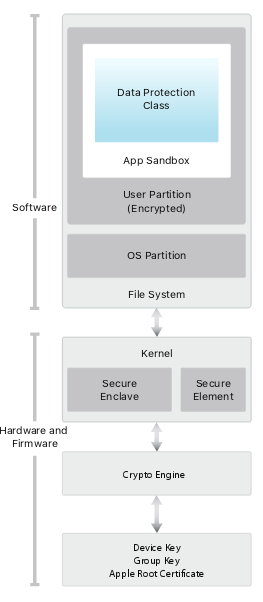
System security
Security model
Security architecture diagram of iOS provides a visual overview of the different technologies which will be explain in detail in the next sections.
- More information: https://www.apple.com/business/docs/iOS_Security_Guide.pdf
Secure boot chain
The iOS secure boot chain system uses secure boot chain mechanism to provide security in the booting process.
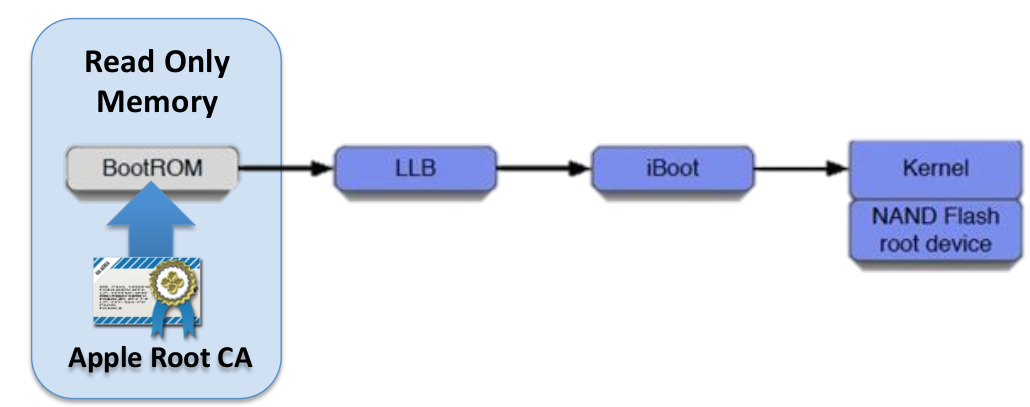
- Boot ROM: it contains the Apple root certificate with the authentic public key. Its code is contained in the processor and it can’t be updated or changed. It verifies that the LLB is properly signed and it has not been tampered before loading.
- Low-level boot loader (LLB): This is the lowest level of code that can be updated. It also verifies the signatures of firmware of iBoot before loading it.
- iBoot: It verifies the signature of the iOS kernel before starting the kernel. This secure boot chain also prevents any malware that can affect at the boot level.
- Kernel: after all the steps have been verified, the kernel can initialize.
For devices with a Secure Enclave, the Secure Enclave co-processor also utilizes a secure boot process that ensures its separate software is verified and signed by Apple.
Jailbreak
The objective is to find a vulnerability in one of the steps of the boot chain to gain an maintain root access on the device.
Attacking this chain of trust is how jailbreaking works. Jailbreak authors need to find a bug somewhere in this chain to disable the verification of the components further down the chain. Exploits of the Boot ROM are the most desirable because this is the one component Apple can’t change in a software update.
Basically, there are two types of jailbreak, described as follows:
- Tethered: In tethered jailbreak, every time we reboot the device, we need to connect iDevice to the system in order to jailbreak it
- Untethered: In untethered jailbreak, we just need to jailbreak the device once and then we can use it at all time
Crypto engine
Since the release of the iPhone 3GS, Apple has built encryption into the hardware and firmware of its iPads and iPhones. Every iOS device now has a dedicated Advanced Encryption Standard (AES) 256-bit crypto engine that sits between the flash storage and main system memory. The engine works in conjunction with the SHA-1 cryptographic hash function, which is implemented in the hardware as well, to reduce overhead for cryptographic operations.
Secure enclave
The Secure Enclave is a coprocessor which uses encrypted memory and includes a hardware random number generator. It provides all cryptographic operations for Data Protection key management and maintains the integrity of Data Protection even if the kernel has been compromised. Communication between the Secure Enclave and the application processor is isolated to an interrupt-driven mailbox and shared memory data buffers.
The Secure Enclave is also responsible for processing fingerprint and face data from the Touch ID and Face ID sensors, determining if there’s a match, and then enabling access or purchases on behalf of the user.
Encryption and Data Protection
Sandbox
Applications are shunted into a virtual container that consists of detailed rules specifying which system resources a subject is allowed to access, such as network resources, file read and writes, the ability to fork processes, and so on. On OS X you can control some of how your application is sandboxed, but on iOS all third-party applications are run with a single restrictive policy.
In terms of file access, processes are generally confined to their own application bundle directory; they can read and write only the files stored there.
File Data Protection
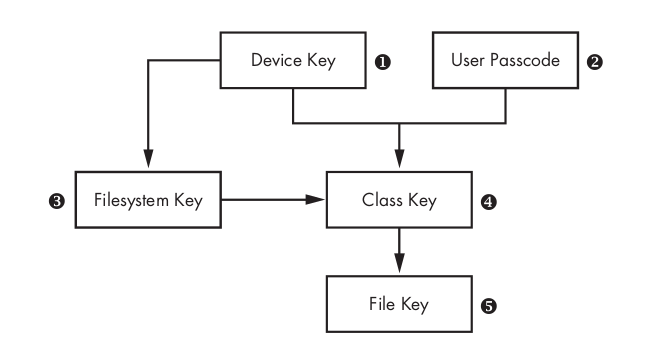
Every time a file on the data partition is created, Data Protection creates a new 256-bit key (the File key [5]) and gives it to the hardware AES engine, which uses the key to encrypt the file as it is written to flash memory using AES CBC mode. It is used to encrypt the file contents. This key is stored in the files’s metadata.The Class Key [4] is a dedicated key for a particular Data Protection class so that files classified with different protection levels use separate cryptographic keys.
The Filesystem Key [3] is a global encryption key used to encrypt the file’s security-related metadata after the metadata is encrypted by the Class Key.
The Device Key [1], also known as the UID key, is unique for each device and accessible only by the hardware AES engine, not by the OS itself. This is the master key of the system, as it were, which encrypts the Filesystem Key and the Class Keys.
The User Passcode [2], if enabled, is combined with the Device Key when encrypting Class Keys.
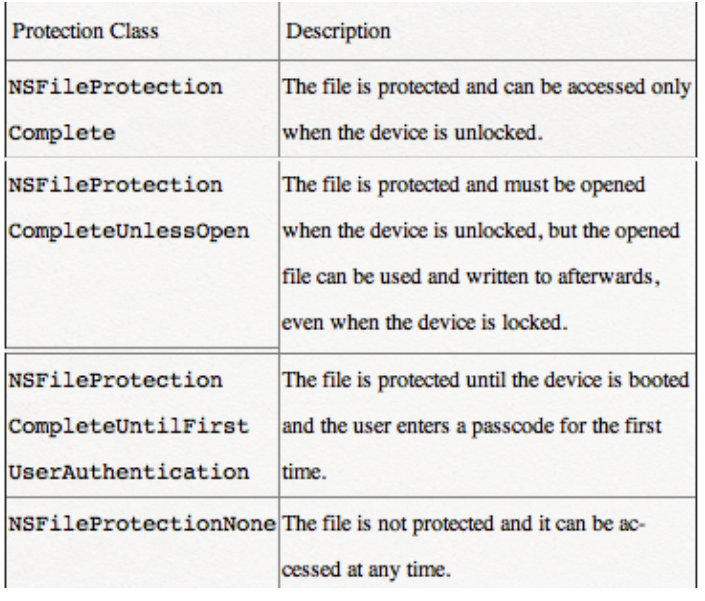
Data protection classes
- NSFileProtectionComplete: The class key is protected with a key derived from the user passcode and the device UID. Shortly after the user locks a device (10 seconds, if the Require Password setting is Immediately), the decrypted class key is discarded, rendering all data in this class inaccessible until the user enters the passcode again or unlocks the device using Touch ID or Face ID.
- NSFileProtectionCompleteUnlessOpen: Some files may need to be written while the device is locked. A good example of this is a mail attachment downloading in the background.
- NSFileProtectionCompleteUntilFirstUserAuthentication: This class behaves in the same way as Complete Protection, except that the decrypted class key isn’t removed from memory when the device is locked. The protection in this class has similar properties to desktop full-volume encryption, and protects data from attacks that involve a reboot. This is the default class for all third-party app data not otherwise assigned to a Data Protection class.
- NSFileProtectionNone: This class key is protected only with the UID, and is kept in Effaceable Storage. Since all the keys needed to decrypt files in this class are stored on the device, the encryption only affords the benefit of fast remote wipe. If a file isn’t assigned a Data Protection class, it is still stored in encrypted form (as is all data on an iOS device).
Keychain Data Protection
Many apps need to handle passwords and other short but sensitive bits of data, such as keys and login tokens. The iOS Keychain provides a secure way to store these items.
Keychain data is protected using a class structure similar to the one used in file Data Protection. These classes have behaviors equivalent to file Data Protection classes, but use distinct keys and are part of APIs that are named differently.
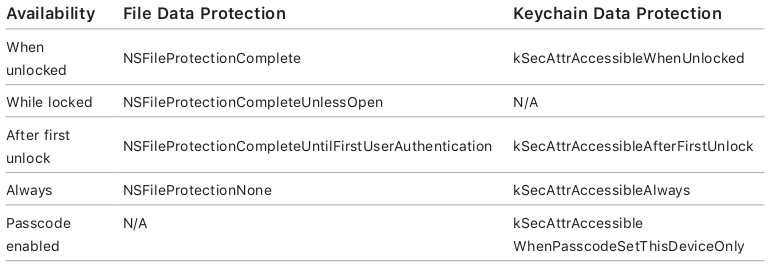
- NSFileProtectionComplete: The file is stored in an encrypted format on disk and cannot be read from or written to while the device is locked or booting. If this options is not set, sensible data can be saved in iCloud or iTunes during automatic backups.
- kSecAtrAccessibleAfterFirstUnlock: the data remains accessible until the next restart. This is recommended for items that need to be accessed by background applications.
- kSecAttrAccessibleAlways: The data in the keychain item can always be accessed regardless of whether the device is locked. Not recommended.
- kSecAttrAccessibleWhenPasscodeSetThisDeviceOnly: The data in the keychain can only be accessed when the device is unlocked. Only available if a passcode is set on the device. This is recommended for items that only need to be accessible while the application is in the foreground.
App Security
Application signing
Once the iOS kernel has started, it controls which user processes and apps can be run. To ensure that all apps come from a known and approved source and haven’t been tampered with, iOS requires that all executable code be signed using an Apple-issued certificate. Mandatory code signing extends the concept of chain of trust from the OS to apps, and prevents third-party apps from loading unsigned code resources or using self-modifying code.
Unlike other mobile platforms, iOS doesn’t allow users to install potentially malicious unsigned apps from websites, or run untrusted code. At runtime, code signature checks of all executable memory pages are made as they are loaded to ensure that an app hasn’t been modified since it was installed or last updated.
- Note: This will be needed to be taken into account if the pentester modifies the binary during the test.
Runtime process security
Once an app is verified to be from an approved source, iOS enforces security measures designed to prevent it from compromising other apps or the rest of the system.
All third-party apps are “sandboxed,” so they are restricted from accessing files stored by other apps or from making changes to the device. This prevents apps from gathering or modifying information stored by other apps. Each app has a unique home directory for its files, which is randomly assigned when the app is installed. If a third-party app needs to access information other than its own, it does so only by using services explicitly provided by iOS.
Objective C
MVC design
The iOS applications are bases on the Model-View-Controller design. This concept is really useful while performing dynamic analysis.
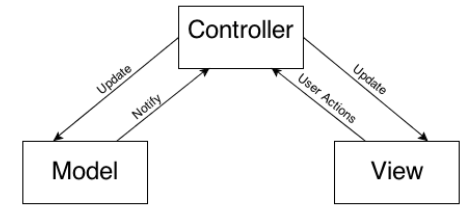
- View displays the information that is contained in the Model. However, they do not communicate directly due to the controller is needed.
- Model: Model contains the data. The Model objects obtain the data either from a database or the files that could be located locally or externally.
- Controller: It acts as a mediator between Model and View, so all communication happens through Controller
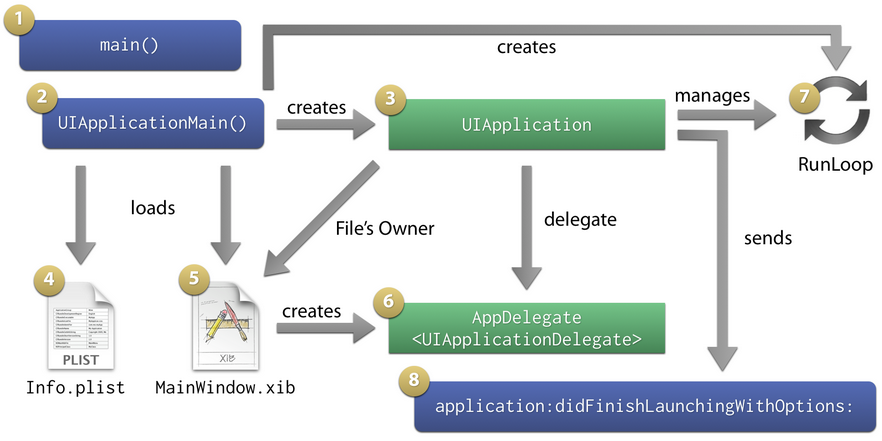
App Execution Flow
-
Like all the other programming languages, the application starts with the main() (step 1). It calls UIApplicationMain().
-
The “UIApplicationMain()” function (step 2) is an entry point to to create the application object and the application delegate. It is located in the “UIKit” framework. Then, it creates the main application object (step 3)
-
Next, UIApplicationMain() loads and parses your app’s Info.plist (step 4). If it contains a key named “Main nib file base name” (NSMainNibFile), the function will also load the NIB file specified there (step 5).
-
By default, the main NIB file is called MainWindow.nib. It contains at least an object representing the application delegate, connected to the File’s Owner’s delegate outlet (step 6), and a UIWindow object that will be used as the app’s main window, connected to an outlet of the app delegate. If you used a view-controller-based app template, the NIB file will also contain your app’s root view controller and possibly one or more view child controllers.
-
UIApplicationMain() creates the run loop used by the UIApplication instance (step 7).
-
application:willFinishLaunchingWithOptions it is called by UIApplication to notify its delegate that the launch process is finishing, and nearly ready to run (step 8).
- More information: https://oleb.net/blog/2011/06/app-launch-sequence-ios/
Delegate class
“Let’s say you are going to create a particular bird. You start with a predefined class definition of a bird (provided in the existing framework as, say, CFBird). The existing framework class assumes all birds have certain things in common — they hatch and grow the same, poop the same, fly the same, and lay eggs the same way, etc. (tee hee, I said poop. ) But different birds look different, are different sizes, chirp differently, eat different things, and may mate differently.
So let’s say Apple provided you with the basic bird class (with hatching, growing, pooping, flying and egg-laying behavior already built in).
Here now in this more advanced age of object-oriented design, there’s a concept (design pattern) called “delegation” and it’s a cool way to easily implement custom classes, assuming ahead of time that you’ll likely never need to worry about anything else about creating birds other than specifying how they differ from each other — how they look (size and color) and how they chirp, eat and mate.
So, the people who designed the CFBird class have set up a “protocol” which specifies the “delegate methods” (kinda like “callbacks” in C) which is all your new class will need to implement to create your custom bird, and you’re done! Basically the class is going to call into your code when your particular bird is drawn, when it chirps, eats and mates. These tasks are “delegated” to you in your subclass of CFBird.
Everything else is handled for you, and you only need to concern yourself with what is different about your bird, and forget about what is the same amongst all birds, simplifying your life and making things more consistent.
In your code, when you specify your new class of bird, in the @implementation you’ll make reference to a protocol, and by doing so you are telling the system that you agree to implement the methods specified in that protocol which will detail exactly how your particular bird is going to look, chirp, eat, and mate. Done and done.
The subclassing comes first, and the possible delegate methods follow if you specify a protocol to follow.”
- Source: http://banagale.com/ios-objective-c-app-delegates-explained-using-birds.htm
Messages
In Objective-C you don’t call a method (like in Java or C++), you send a message. The syntax for these messages involves a keyword-infix notation for arguments inside of a set of square brackets. The names of messages are called “selectors”, and the Objective-C compiler translates these into calls to objc_msgSend.
Example:
// instantiate objects
target *target = [[target alloc] init];

// send a message with no arguments
[target method1];

// send a message with one argument
[target method1:arg1];

// send a message with two arguments
[target method1:arg1 method2:arg2];
- More information: https://developer.apple.com/library/archive/documentation/Cocoa/Conceptual/ObjCRuntimeGuide/Articles/ocrtHowMessagingWorks.html#//apple_ref/doc/uid/TP40008048-CH104-SW1